
Algolia DocSearch
Algolia DocSearch is a search engine designed to automatically extract content from Open Source documentations, allowing it to have an instant search on tech websites.
Why DocSearch
- It is free and was designed especially for open source projects and technical documentations/blogs.
- It already has built-in support for Astro Starlight.
- It is built on Algolia Autocomplete, providing better accessiblity and customizability.
- It offers new features to better the user experience such as search history log, a favorite system, and support for Google Analytics Integration.
How to Get Started
Registration can be done via the DocSearch Site where you’ll need to enter your website URL and email. (This process could take a few days for approval.) Once approved, you will recieve an email to accept their invitation to get started, where you’ll be taken to the Algolia Dashboard. Further configuration can be made via this Dashboard.
Astro Starlight Integration
-
Install
@astrojs/starlight-docsearch:Terminal window npm install @astrojs/starlight-docsearchTerminal window pnpm add @astrojs/starlight-docsearchTerminal window yarn add @astrojs/starlight-docsearch -
Add DocSearch APIs to the Astro Starlight
pluginsconfig viaastro.config.mjs:astro.config.mjs import { defineConfig, squooshImageService } from "astro/config";import starlight from "@astrojs/starlight";import starlightLinksValidator from "starlight-links-validator";export default defineConfig({site: "https://splashkit.io/",integrations: [starlight({title: "SplashKit",description:"SplashKit is a cross-platform game engine for C, C++ and Objective-C. It provides a simple API for 2D game development.",plugins: [starlightLinksValidator({errorOnRelativeLinks: true,}),starlightDocSearch({appId: "DOCSEARCH_API_ID",apiKey: "DOCSEARCH_API_KEY",indexName: "DOCSEARCH_INDEX_NAME",}),],}),],}); -
Optional Further configuration can be done by following guides on the
Starlight Documentation
.
Custom Ranking
This following section provides a step-by-step guide to updating the custom ranking system to prioritize categories during search operations.
Steps
-
Start off by heading over to the
Algolia Dashboard
.
-
Click on the Go To Crawler button and select the crawler you want to adjust.
-
Once in the crawler, go to the Editor via the sidebar.
-
Add DocSearch APIs to the Astro Starlight
pluginsconfig viaastro.config.mjs:actions: [{indexName: "sksearchtest",pathsToMatch: ["https://sksearchtest.netlify.app/**"],recordExtractor: ({ $, helpers }) => {const lvl0 =$('details:has(a[aria-current="page"])').find("summary").find("span").first().text() ||"Documentation";return helpers.docsearch({recordProps: {lvl0: {selectors: "",defaultValue: lvl0,},lvl1: "main h1",lvl2: "main h2",lvl3: "main h3",lvl4: "main h4",lvl5: "main h5",lvl6: "main h6",content: "main p, main li",apiBoost: lvl0 === "Developer Documentation" ? 10 : 1,usageBoost: lvl0 === "Usage Examples" ? 5 : 1,},indexHeadings: true,aggregateContent: true,});},},]; -
Inside the
recordProps, you’ll notice two variables:apiBoostandusageBoost. These variable names can be customized to suit your needs. -
The values assigned to these variables represent the boost level. The higher the number, the stronger the boost.
-
To change which category receives a boost, simply adjust the name that the condition checks. For example, you can modify
"Developer Documentation"to check for a different category name, such as"Installation"or"Tutorials and Guides". -
Once completed, navigate to the Indices tab viable the sidebar and select the index you’re working on.
-
In the Index page, head to the Configuration tab in the top navigation bar and select Ranking and Sorting:
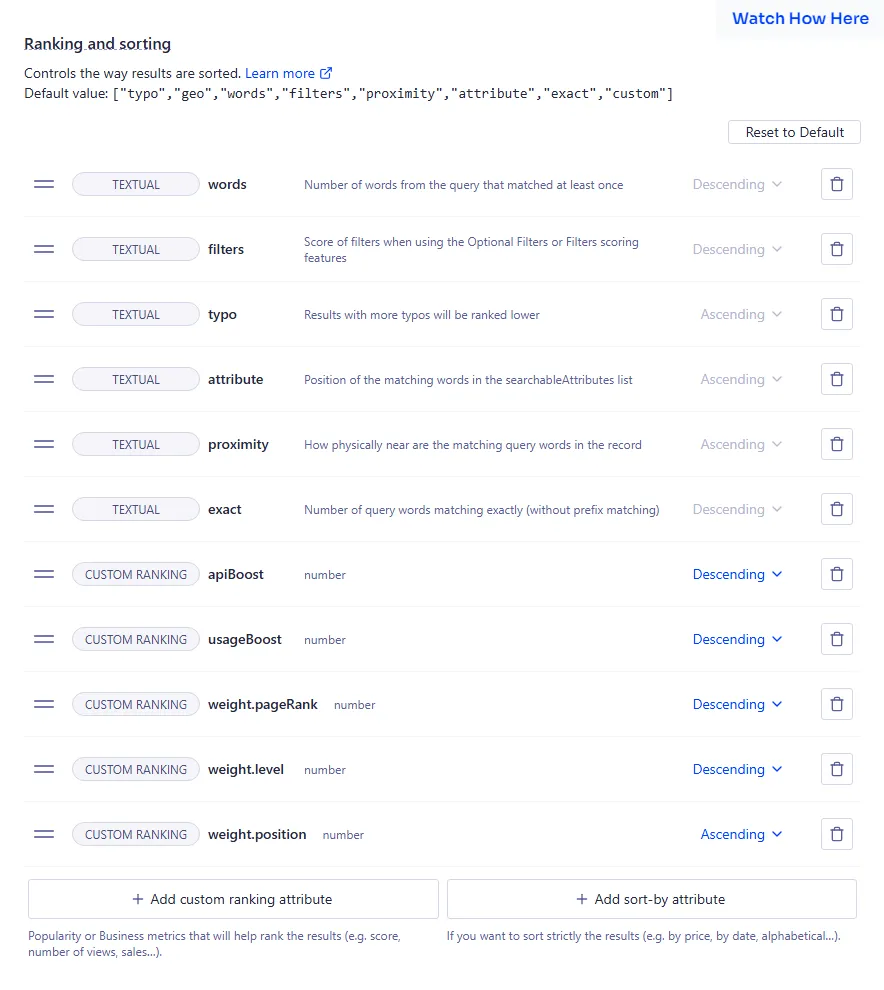
-
As seen in the image above, place the variables defined in the Editor earlier by clickin the + Add custom ranking attribute button. The order of priority should follow a top-to-bottom sequence, with the top-most being the highest priority. Note: It is not recommended to place these variables above the preset textual ranking, as the preset rankings serve as the core foundation of the search engine’s ranking system.