
Guide to creating usage examples
This guide explains how to create a usage example for the Splashkit website.
What are Usage Examples?
Usage examples demonstrate a specific Splashkit function within a simple, small program. The goal is to keep the program minimal while clearly showing how the function works or how it can be utilised.
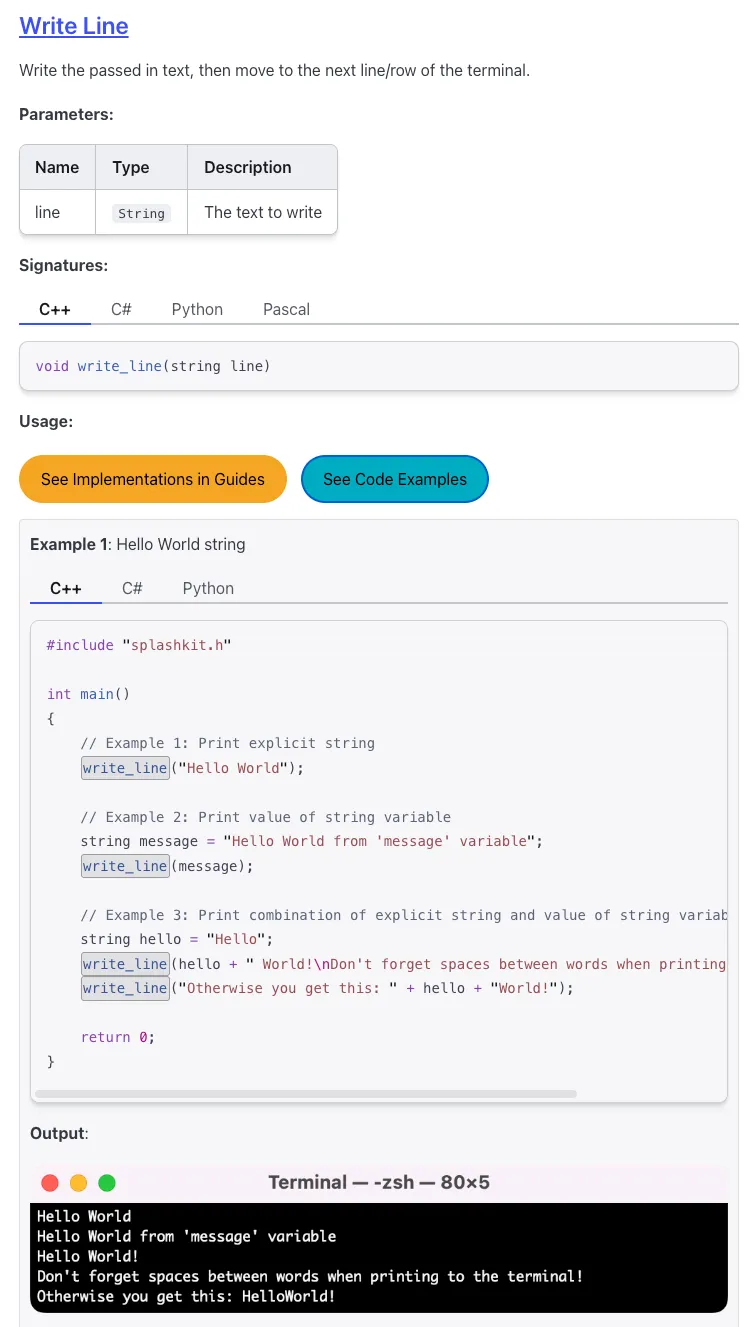
For instance, the write_line example on the Splashkit site shows how the write_line function
works, with a relevant title, program code, and a file showing the program output.
Steps to Create a Usage Example
An initial usage example includes 6 files:
- C++ version
- C# (top-level statements) version
- C# (Object-Oriented Programming) version
- Python version
- Descriptive title for the example, in a text file
- Screenshot of the output
-
Choosing a Function
The planner board has numerous usage example suggestions for various functions, however you are welcomed and encouraged to come up with your own creative ideas for these. Scroll through the API Documentation to find various functions you could use for the usage example, when coming up with an idea, make sure to also check to see if anyone else has already done it.
The goal is to create one usage example per function in the SplashKit library. Building out these single examples for each function is the priority to round out the variety of examples available.
If you come up with a creative idea for a function that already has an example, please share it in the SplashKit group chat or reach out to your Capstone Mentor to discuss whether it’s a good idea to add another example for that function.
-
Creating The Program
Create the program with as few lines of code as possible. You’ll need to write the program in C++, C# (using top-level statements and OOP version), and Python, all using Splashkit. Start with the language you’re most comfortable with, then convert it to the others.
Note for C# to-level: Use
using static SplashKitSDK.SplashKit;. For the OOP version: useusing SplashKitSDK;.Example
If C++ is your strength, begin by creating a small program like this
dec_to_hexexample:#include "splashkit.h"int main(){write_line("Hello! Welcome to the decimal to hexadecimal converter.");// Prompt the user for a decimal inputwrite_line("Please enter a decimal number:");// Read the input as a stringstring dec_input = read_line();// Convert the input string to an unsigned integerunsigned int dec_value = convert_to_integer(dec_input);// Convert the decimal value to hexadecimal formatstring hex_value = dec_to_hex(dec_value);// Display the result in hexadecimal formatwrite_line("The decimal value in hexadecimal format is: " + hex_value);return 0;}This example includes meaningful comments that clearly explain each part of the program, which helps readers understand both the structure and function. When converting to C#, notice that the structure and comments are kept consistent, with syntax changes specific to the language:
using static SplashKitSDK.SplashKit;WriteLine("Hello! Welcome to the decimal to hexadecimal converter.");// Prompt the user for a decimal inputWriteLine("Please enter a decimal number:");// Read the input as a stringstring dec_input = ReadLine();// Convert the input string to an unsigned integeruint dec_value = ConvertToInteger(dec_input);// Convert the decimal value to hexadecimalstring hex_value = DecToHex(dec_value);// Display the resultWriteLine("The decimal value in hexadecimal format is: " + hex_value); -
Title and Screenshot
Provide a creative title and a screenshot of the program’s output.
Title: Simple Decimal to Hexadecimal Converter
Take a screenshot of the output window and save it. If the screenshot is of the terminal window, please crop out any commands used to run the program.
-
Adding these files to Splashkit Starlight.io
Now that you’re done, you should have the following 6 files when completing an initial usage example PR:
- txt file - C++ file - python file - C# (top-level statements) file - C# (OOP) file - Screenshot of the output
Now you’ll need to rename these before adding them to the Splashkit Starlight.io repo.
Example
Say you’ve created a write_line program. Rename the files as follows:
write_line-1-example-oop.cswrite_line-1-example-top-level.cswrite_line-1-example.cppwrite_line-1-example.png or .gifwrite_line-1-example.pywrite_line-1-example.txtIn a separate pull request, to add to existing examples:
write_line-1-hello-world-beyond.cppNow you can add these files to the Splashkit Starlight.io repo. If when you add them you find there is already some files of a usage example using this same function, then you should increment the number in the file name by 1. Furthermore, it is important that you use the function’s unique global name for the files names (This only applies for functions that are overloaded.)
Now that your files are named, add all of your files to the usage-examples folder under the
appropriate function category (e.g., terminal/). The location in the Statlight.io repo is:
Directorypublic
Directoryusage-example-files
Directoryanimations/
- …
Directoryaudio/
- …
Directorycamera/
- …
Directorycolor/
- …
Directorygeometry/
- …
Directorygraphics/
- …
Directoryinput/
- …
Directoryinterface/
- …
Directoryjson/
- …
Directorylogging/
- …
Directorynetworking/
- …
Directoryphysics/
- …
Directoryrasberry/
- …
Directoryresources_bundles/
- …
Directoryresources/
- …
Directorysprites/
- …
Directoryterminal/
- write_line-1-example-oop.cs
- write_line-1-example-top-level.cs
- write_line-1-example.cpp
- write_line-1-example.png
- write_line-1-example.py
- write_line-1-example.txt
Directorytimers/
- …
Directoryutilities/
- …
Directorywindows/
- …
For more information regarding the proper file naming and placement can be found within the repo in
the CONTRIBUTING.mdx. The location of the file can be found here:
Directorypublic
Directoryusage-examples
- CONTRIBUTING.mdx
Next Steps
Now follow the steps in Usage Example Pull Requests, and submit your usage example for review. For doing a peer review, follow the steps in Peer Review Guide for Usage Examples.