
Unit Testing Guide
Introduction
Section titled “Introduction”SplashKit uses Catch2 2.x as a framework for unit tests.
Tests are written in C++ with the aid of macros from Catch2. Test files are located at:
Directorycoresdk
Directorysrc
Directorytest
- unit_test_main.cpp
unit_test_<name>.cpp
unit_test_main.cpp is the entry point for all unit tests. You do not need to modify this to write
your own tests or update existing ones.
The unit_test_<name>.cpp files contain tests for related parts of SplashKit. For example,
unit_test_utilities.cpp has tests for SplashKit’s utility functions. A test file must include the
Catch2 header file along with any other includes required:
#include "catch.hpp"Writing a Unit Test
Section titled “Writing a Unit Test”At a minimum, a unit test consists of a TEST_CASE and an assertion (usually REQUIRE):
TEST_CASE("gets the number of milliseconds that have passed since the program was started", "[current_ticks]"){ unsigned int result = current_ticks(); REQUIRE(result >= 0);}TEST_CASE(name, [,tags]) defines a test case with the given name and, optionally, one or more
tags.
REQUIRE evaluates an expression and aborts the test as a failure if the result is false.
REQUIRE_FALSE is similar but fails if the expression evaluates true. There are
other assertion macros but
these are the most common.
A test may contain multiple assertions:
TEST_CASE("random number float between 0 and 1 is generated", "[rnd]"){ float result = rnd(); REQUIRE(result >= 0); REQUIRE(result <= 1);}You may write tests that have some common steps, such as defining a variable. You can define one or
more SECTION(name) inside a TEST_CASE. The TEST_CASE is run from the start for each SECTION.
TEST_CASE("return a SplashKit resource of resource_kind with name filename as a string", "[file_as_string]"){    const resource_kind RESOURCE = resource_kind::BUNDLE_RESOURCE;    const string RESOURCE_PATH = "blah.txt";
    SECTION("filename is a valid file")    {        string result = file_as_string(RESOURCE_PATH, RESOURCE);        string expected = "BITMAP,ufo,ufo.png\n";        REQUIRE(result == expected);    }    SECTION("filename is an empty string")    {        string result = file_as_string("", RESOURCE);        string expected = "";        REQUIRE(result == expected);    }    SECTION("filename is an invalid file")    {        string result = file_as_string("invalid.txt", RESOURCE);        string expected = "";        REQUIRE(result == expected);    }}
This test has three SECTIONs, so the TEST_CASE will run three times. Each time, the RESOURCE
and RESOURCE_PATH variables will be defined.
Building the test project
Section titled “Building the test project”-
Open a terminal and install prerequisites with these commands:
Terminal window sudo apt-get updatesudo apt-get upgrade -ysudo apt-get install -y \git build-essential cmake g++ libpng-dev libcurl4-openssl-dev libsdl2-dev \libsdl2-mixer-dev libsdl2-gfx-dev libsdl2-image-dev libsdl2-net-dev libsdl2-ttf-dev \libmikmod-dev libbz2-dev libflac-dev libvorbis-dev libwebp-dev libfreetype6-dev -
Install the CMake Tools extension from the VS Code extension browser or here.
-
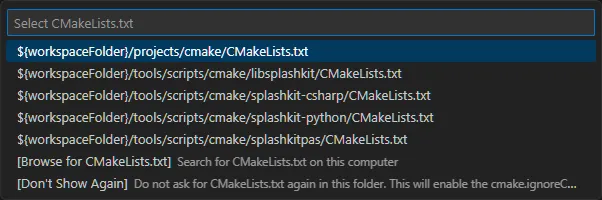
Configure the extension:
Select${workspaceFolder}/projects/cmake/CMakeLists.txt
Select the Linux preset
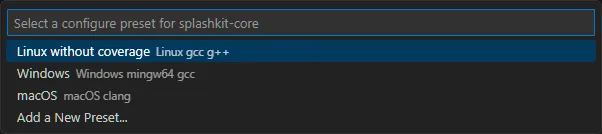
Select the Default configure preset

In the CMake Tools extension click the button next to Build and select
skunit_tests
next to Build and select
skunit_tests

Click the button next to
Debug and select skunit_tests

-
Build test project:
From the command line:Terminal window cd projects/cmakecmake --preset Linuxcmake --build build/Or in VS Code:
In the CMake Tools extension, click the Build button. The test project will also be built when you refresh tests on the Testing tab of VS Code.

-
Install the CMake Tools extension from the VS Code extension browser or here.
-
Configure the extension:
Select${workspaceFolder}/projects/cmake/CMakeLists.txt
Select the macOS preset
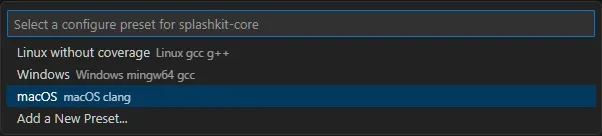
Select the Default configure preset
In the CMake Tools extension click the button next to Build and select
skunit_tests
Click the button next to
Debug and select skunit_tests
-
Build test project:
From the command line:Terminal window cd projects/cmakecmake --preset macOScmake --build build/Or in VS Code:
In the CMake Tools extension, click Build. The test project will also be built when you refresh tests on the Testing tab of VS Code.
-
Open the MINGW64 terminal and install prerequisites with these commands:
Terminal window pacman -Syupacman -S mingw-w64-x86_64-gcc mingw-w64-x86_64-gdb mingw-w64-x86_64-cmake mingw-w64-x86_64-make -
Install the CMake Tools extension from the VS Code extension browser or here.
-
Configure the extension:
Select${workspaceFolder}/projects/cmake/CMakeLists.txt
Select the Windows preset
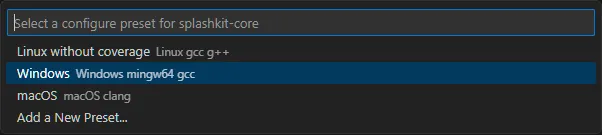
Select the Default configure preset
In the CMake Tools extension click the button next to Build and select
skunit_tests
Click the button next to
Debug and select skunit_tests
-
Build test project:
From the command line:Terminal window cd projects/cmakecmake --preset Windowscmake --build build/Or in VS Code:
In the CMake Tools extension, click Build. The test project will also be built when you refresh tests on the Testing tab of VS Code.
Running unit tests
Section titled “Running unit tests”From the command line
Section titled “From the command line”-
It’s a good idea to run the unit tests in a random order so that you can confirm that they run indepedently of one another:
Terminal window cd ../../bin./skunit_tests --order randBy default, this will only show reports for failed tests. To show reports for successful tests as well, use the option
--success. More command line options can be found in Catch2’s documentation. -
If you want to run a specific test, or group of tests, you can do so:
Terminal window ./skunit_tests <test spec>The
test speccan be a test name or tags and supports wildcards. For example,*string*would run all of the tests with “string” in the name.
-
It’s a good idea to run the unit tests in a random order so that you can confirm that they run indepedently of one another:
Terminal window cd ../../bin./skunit_tests.exe --order randBy default, this will only show reports for failed tests. To show reports for successful tests as well, use the option
--success. More command line options can be found in Catch2’s documentation. -
If you want to run a specific test, or group of tests, you can do so:
Terminal window ./skunit_tests.exe <test spec>The
test speccan be a test name or tags and supports wildcards. For example,*string*would run all of the tests with “string” in the name.
In VS Code
Section titled “In VS Code”You can run tests from the Testing tab in VS Code
![]()
- Running all tests:
Click Run Tests. Each test will be run and the status of each can be seen in the test list after a test runs.

- Running a specific test:
Click Run Test next to any test on the test list to run it

